Surgical gloves (yes, really)
What to do
1 Create a counterweight of the correct mass by adding Blu-tac
2 Make a new counterweight of the same mass using the self-adhesive lead strip
3 Enjoy
How to do it
1 Park the arm and cover the stylus
2 If it is an RB300, set the tracking force spring to its maximum setting of 3g+
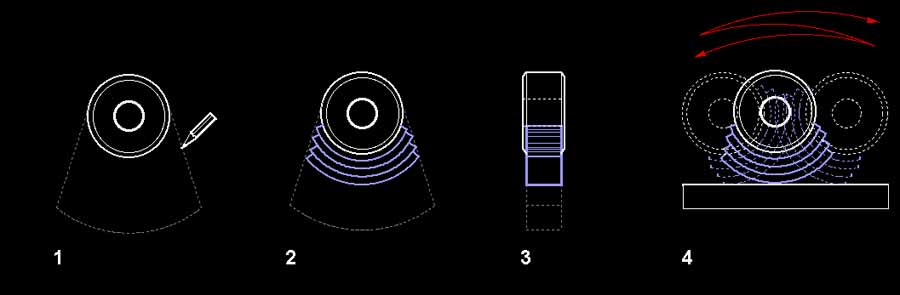
3 Make a note of how close to the bearings the counterweight is and remove it.
Place the weight on a piece of paper and draw round it.
4 Make a template by sketching the shape you want on the paper around the
outline of your counterweight (Figure 1 below)
5 Cut the Blu-tac into strips the same width as the counterweight
6 Put the counterweight in position on the template then trim the Blu-tac to
length and build it up in strips on the bottom of the counterweight, keeping within your
template (Figure 2 below)
7 Build up several strips and then put the counterweight back, zero the anti-skate
setting and set the tracking force using the stylus balance by moving the counterweight along
the rear-stub. Note how much closer to the bearing the counterweight is. You should be able to
guess the amount of Blu-tac you'll need to add to get the counterweight up to the bearing end
of the stub.
8 Repeat steps 6 and 7 until you have the counterweight within 2-3 mm of the
bearing end of the rear-stub.
9 Weigh the counterweight and note down the mass.
10 Remove the Blu-tac in one piece.
11 Put on your surgical gloves and, using the lighter fluid and some tissue paper,
clean the counterweight carefully to remove all the oils from handling.
12 Unroll some of the lead strip, without revealing the adhesive, and wrap it
around the counterweight so that it fits within the lines on your template. Mark the lead, put
it flat on your chopping board and cut it with the craft knife.
13 Lay the piece you have just cut flat on the chopping board and make a mark on
the board at each end of the piece of lead.
14 Put the counterweight in position on the template, peel
the cover off the adhesive and stick the first strip of lead onto the counterweight.
The counterweight is bevelled at the edges so make sure you line
the lead up with the bevel rather than just resting it on the paper.
(Figure 3 below)
15 Pull some more lead off the reel and lay it on the board between the two lines.
Now cut it fractionally longer than the original piece - 1mm extra is plenty.
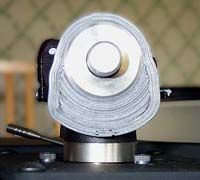
16 Stick this piece to the first piece making sure it overlaps at each end. If you look
at the rear view of the finished item you'll see what you're aiming for. Periodically make more
marks on the chopping board Ð this is much faster than using a ruler. Also, carefully roll the
counterweight and attached lead on the chopping board to ensure good adhesion and smooth
shape.
(Figure 4 below)
17 Repeat steps 15 and 16 checking the mass of the counterweight after every few strips of
lead.
18 Repeat steps 15 to 17 until the counterweight is within 35 grams / 1.5 oz of the target
mass. Cut 3 more strips in the same way as before.
19 The next 2-6 strips of lead need to be long enough to wrap around the counterweight so
as hold all the lead strips on tightly. Unwrap a length of lead off the roll. Place the middle of the
length in the centre of the top of the counterweight and wrap the two ends around the
counterweight so that the join is at the bottom of the weight. Mark and trim the lead so it's
10mm / 1/2 inch long. Prepare 4Ð6 of these strips making sure that each is a little longer than
the previous strip. Weigh the counterweight and long and short strips, adding more short strips
until you reach your target mass.
20 Add the short strips to the counterweight as before.
21 Take the shortest of the long strips, peel the cover off the adhesive, press the middle of
the strip onto the top of the counterweight and wrap the two ends around the counterweight
pressing the lead firmly onto the steel original counterweight and the lead you've added. Make
sure that the join is at the bottom of the counterweight just off-centre. Trim the strip so that
there is no overlap.
22 Repeat step 21, making sure that the join is to the left or right of the previous strip's join.
You can see this clearly if you look at the rear view of the finished item.
23 Keep adding long strips until you are just below the target weight.
24 Fit the counterweight to the arm, zero the anti-skate setting and set the tracking force using
the stylus balance by moving the counterweight along the rear-stub. Ideally it
should be within 1mm (1/16th of an inch) from the bearing end of the rear stub.
Now, set the anti-skate by ear and enjoy!
Decra Led is made by:
North Western Lead Company (Hyde) Ltd.
Newton Moor Industrial Estate, Mill Street, Hyde, Cheshire,
SK14 4LJ, England
+44 (0)161-368-4491
Available at B&Q and costs c. £8 GBP
© the twisted pair 2001
14.12.01: text updated, format tweaked
14.07.01: Rega diagrams added, links updated